What’s a Superhero Birthday Party without some SUPER Eats?? Not very super is what…….
So, let’s start with one of the best parts of any birthday party…..The Cake!!
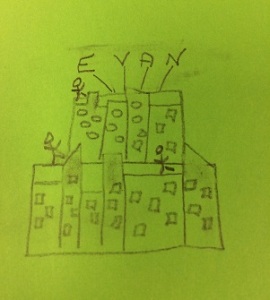
Here is a doodle of the cake that I texted my husband to which he responded, “Where in the world did you get that drawing?” and “What is that supposed to be?” So apparently my doodle skills are a bit lame:
I started putting my cake plan into action by making my topper. Since I was doing an Avenger themed party I had to fit comics into the mix somehow. Below is a picture of the topper which is foam that I cut into letters and mod podged comics over (very tedious work!!). When it was done the letters were hot glued to sucker sticks:
Time to work on the actual cake……..
Cake Ingredients:
- 3 boxed cakes with all of the stuff you need to bake them as listed on the box (I used 2 red velvet and 1 blue suede)
- 1 box black fondant
- 1 box yellow fondant (of which I only used a pinch and I am still slightly bitter)
- Powdered sugar
- 4 cans of frosting (I used cream cheese and vanilla)
- pinch of water
- Cake leveler
- 6-inch cake round wrapped in foil
- Rolling pin
- Pizza cutter
- Silpat is not necessary but makes working with fondant much easier
I needed buildings!! lots and lots of buildings!! I ventured for the first time into the world of fondant…….and wow that stuff is fun (how can you beat edible play dough??)
I bought the fondant that was already colored and used my own tools of the trade. I almost got caught by the “fondant roller” and “fondant cutters” at the store but I outsmarted them and used my pizza cutter and rolling pin.
I followed instructions by kneading and then rolling out the fondant pretty thin using powdered sugar if it felt sticky. If you have a Silpat use it because I am sure it saved me a ton of powdered sugar:
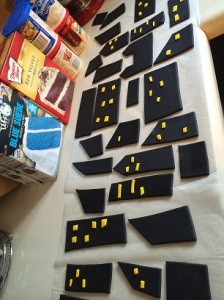
Once I had my fondant rolled out I started cutting building shapes and moving them to waxed paper for drying:
Then I rolled out some yellow fondant and cut out little windows. To stick them to the buildings I put a very small amount of water on the windows and lightly pressed them onto the buildings:
I baked up 7 layers of cakes (which I wisely didn’t use 2 of them because I am sure that would have ended in disaster for a beginner like me). I leveled each layer with a cake leveler (best $12 I have ever spent!!). In the end I stacked 3-9 inch Red Velvet cakes on the bottom, topped that with a 6 inch cake round wrapped in foil and then topped that with 2-6 inch Blue Suede cakes. I used Red and Blue because that just screamed Captain America.
I used cream cheese frosting on the red velvet layers and vanilla icing on the top layers.
Once the cake was frosted I started attaching my buildings to the sides of the cake. The buildings were slightly firm from sitting while I baked the cakes. I layered a few of the buildings by sticking icing to the back of a building and placing it over another.
After my buildings were added I topped with my topper and stuck a few superheroes up there too:
It wasn’t quite a clean as I envisioned but when my son saw it he was very excited so it was a success in my book.
Snacks were next on the agenda…….
I had to get to work finding some super ideas for party snacks. Of course my first step was Pinterest…..which never disappoints.
Unfortunately I can’t give credit to just one person because the things I decided to make were made multiple times by several awesome DIYers….so I will never know who had the original idea (I just know it wasn’t me).
Superhero Suckers have been popular for a while now…..I actually made these for my daughter’s preschool class for valentines day about 3 years ago. I figured this was the perfect time to revisit this kid favorite:
Superhero Sucker Ingredients:
- Suckers (I used tootsie pops)
- Felt
- Hot Glue Gun
- Paper
- Marker
- Foam (I painted my foam with acrylics to resemble earth)
Essentially the hardest part of this project is cutting out all of the little capes and masks:
After everything is cut out assembling is easy……just put the sucker through the cape hole (I put a little dot of hot glue to secure it) and glue the mask to the sucker……easy peasy. The little comic words I glued to the backs of the capes.
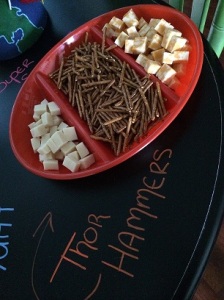
The next and simplest hero treat that I found were “Thor Hammers”
Thor Hammer Ingredients:
- Cheese cut into blocks (I used Colby and Mozzarella)
- Pretzel Sticks
I left the ingredients for the hammers out and the kids put them together themselves.
Another popular superhero treat was the Captain America fruit tray.
Captain America Fruit Tray Ingredients:
- Fruit Dip
- Marshmallows
- Blueberries
- Strawberries
- Round Tray
- Wax Paper
- Large star cookie cutter
So this one had several different versions on Pinterest. I kind of just went my own way with it though because I didn’t have the awesome round dividers and tools other pinners were using. However I was lucky enough to have a large star cookie cutter on hand.
The biggest problem I could see with this was that the strawberries would stain the marshmallows and turn them pink……but I found a solution! I made wax paper dividers between the strawberries and the marshmallows and it worked great. I turned my star cookie cutter upside down and put fruit dip in it.
Up next are Hulk Smash Marshmallows. One of my son’s favorite heroes is Hulk so he had to have some representation on the snack table. I found that a few pinners were dipping marshmallows in green chocolate and putting jimmies on top…..they were super cute so they definitely made the cut
Hulk Smash Marshmallows:
- Green chocolate melts
- Jumbo marshmallows
- Paper Straws
- Chocolate jimmies
- Edible marker
- Foam Block
- Large sucker wrappers with ties (or sandwich bags and ties)
To start I stuck straws in my marshmallows and melted my chocolate melts per the instructions on the package. I dipped my marshmallows in the melts and then dipped the top of the chocolate covered marshmallow in the jimmies. Once I had a foam block filled I stuck it in the fridge for about 5 minutes to harden the chocolate. When the chocolate was hardened I put my “Hulk Smash” face on them with the edible marker.
I made a rookie mistake with these guys and purchased small sucker wrappers which didn’t come close to fitting around them. To right my wrong I cut the tops off of zip lock sandwich bags and they fit perfectly.
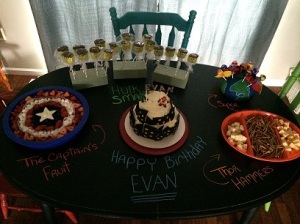
The cake table turned out great! and I had another perfect opportunity to use my chalk markers!!
Now to plan my daughter’s birthday party in March…….I better get busy 🙂


